 Back to GanjaTron's site
Do-It-Yourself E6
Transparency Processing for Masochists!
Let's face it: E6 is one of the most complex photographic process still in use today. There are numerous pitfalls, and a lot of time and effort must be invested to arrive at pristine transparencies. So why bother?
Well, I simply got pissed off with the results I got from those so-called "professional" labs. So I decided to try my own hand and took the challenge upon myself (not another one...) to tackle the process in my own makeshift lab. I grabbed one of those fancy rotary processors off eBay, grabbed an E6 kit, and off I went. Well, sort of -- the first few films were totally wasted!
It was a long winding road, but I gradually developed and fine tuned my own procedure, which I've compiled on this page for your... um, enjoyment???
The Pitfalls
Yeah, lots of 'em! Actually, it's not so much that lots of problems occur. Typically you'll find a recurring defect in your trannies but don't quite know what to do about it. Common problems include:
- Excessively dark or light slides ⇒ incorrect timing or temperature for the first developer (very important).
- Colour shifts ⇒ improper mixing, wrong temperature, or pH deviations of colour developer.
- Muddy slides ⇒ insufficient bleaching/fixing.
The prime directive when preparing solutions for E6 processing is avoiding contamination of the solutions at all costs. In particular, the first and colour developers should never be opened simultaneously; they can contaminate each other merely through vapours! Stirrers, graduates and other utensils must be painstakingly cleaned after every solution. Using separate, dedicated utensils for each solution is an effective safeguard against contamination and saves rising water.
Keeping the process at exactly 38° is very important for the first and colour developers, which is why rotary processors come in handy here. Typical tolerances for consistent results are within ±0.1° for these solutions, which gives you an idea of the sensitivity for which the E6 process is notorious. However, subsequent steps in the process are less critical.
Assuming proper mixing and tempering, most time and effort will be spent in figuring out optimal times for the first developer and the degree of pH correction. The chemical manufacturers may provide rough guides to get you started, but in general this is a teething trial and error process which depends specifically on the type of film you're using. Rotary processors generally require longer times for the first developer than manual processing (does anybody actually do this?), presumably due to the high degree of oxidation from foam buildup by the film reels in the tank. The colour developer is particularly sensitive to changes in pH, which affects the colour balance. As a general rule, a yellow cast is compensated by reducing the pH (adding acid, e.g. H2SO4), while a blue cast is treated by increasing it (adding base, e.g. NaOH). Depending on the concentration of the acid or base, the required amount can be very small -- a few millilitres per litre of developer will yield a noticeable change. When working with small quantities, this can only be accurately measured with a pipette. Needless to say, eye protection is a must here.
The final bath contains a wetting agent and formaldehyde, the latter being a known carcinogen. Use only in good ventilation and wear eye protection when wiping the film (lest it snaps out of the wiper and sends the stuff flying in your face). Note that a freshly developed film will look ruined; dark and muddy, bluish on one side and rusty on the other. Don't let that fool you; the film will slowly clear up as it dries, typically within 1/2 hour. Only then can you start looking for possible flaws in your process (or gloat over pristine slides once you've really perfected it).
The Gear
I use the entry level JOBO CPE2 processor with an old Ilford DT-600 timer, which gets the job done. I got good initial results with Tetenal's ColorTec E6 kit but eventually migrated to AGFA's AP44 kit because it was cheaper and optimised for the films I routinely use, namely AGFA's consumer grade CT Precisa and professional RSX films. I use the AP44 kit for 0.5 litres, giving me two runs of 250 ml each which is sufficient for JOBO's 1520 tank loaded with up to two 35mm or medium format films. Unfortunately, this kit is very difficult to find and its availability has become even more iffy now that AGFA Photo is closing down and selling off its production facilities. However, colour slide chemistry is pretty similar regardless of manufacturer, and what's described here holds true for any E6 kit.
The Procedure
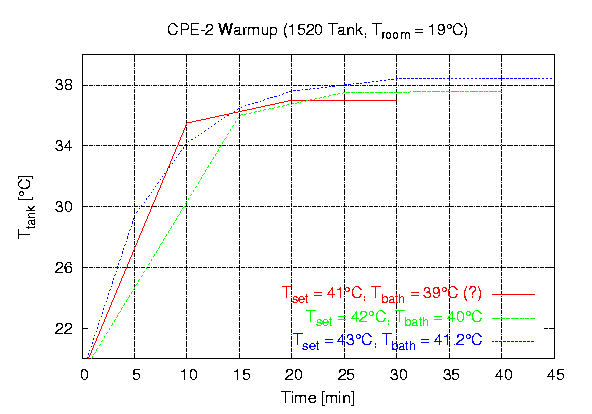
The CPE holds up to four 600ml bottles (containing chemicals) and four 250 ml graduates (containing tempered water for the first rinse). The temperature of the first developer inside the tank is taken as reference, regardless of what the actual setting on the CPE is. I've conducted measurements to determine the temperature inside the tank as a function of room temperature and the temperature set on the CPE's dial. My basement never gets warmer than 20° (except maybe in summer), which means a significant amount of heat is lost to the environment during the process, as indicated by the measurements show below.

As shown in the graph, it took some 30 minutes for the tank to reach 38°, and only when I set the CPE to 43°, resulting in a bath temp (measured at the thermometer clip) of ca. 41°. This contrasts starkly with the typically recommended warmup time of only 5-10 minutes, which is presumably based on "normal" room temperatures well over 20°. With a bath temp of 41°, the first developer has a temperature of ca. 40°. Tests I've conducted showed that this drops to 38° once poured into the tank, which is then maintained if the tank is brought up to temp as show in the graph. This 2° drop is presumably due to loss to the environment and in particular the CPE's lift. Consequently, my temperatures indicated below have been increased by 2° to compensate.
Because the CPE doesn't temper uniformly, containers to the right of the first developer will be slightly below 40°, while those to the left will be slightly above. To compensate, I arrange the solutions in the processor in alternation relative to the first developer according to their sequence in the process. This ensures, for example, that the slight temperature drop induced by the first rinse (located to the right of the first developer) is compensated by the temperature rise by the reversal bath immediately following it (located at roughly equal distance to the left of the first developer). I'm not entirely sure how much of a difference this makes in the final results, but I've noticed deviations of up to 1° between the first developer and the rightmost graduate containing the first rinse. Note that JOBO's costlier CPP2 and CPA2 processors are equipped with pumps to circulate the tempering bath and thus avoid this problem altogether.
As mentioned above, the colour developer usually needs pH adjustment for proper colour balance. The colour developer of the 0.5 litre AP44 kit is actually not intended for rotary processing and results in slides with a very noticeable blue cast (presumably due to increased oxidation compared to manual processing). AGFA's AP44 docs specify a colour developer pH of 12.2 for rotary processing, while the freshly mixed solution before adjustment has a pH of about 12.0-12.1, so it's necessary to add a few drops of NaOH. I use a Greisinger GPH014 pH meter for this adjustment which must be calibrated prior to every measurement. The pH measurement (and calibration, if the meter lacks temperature compensation) must be done at processing rather than room temperature, otherwise your reading will be too low since pH decreases with an increase in temperature! The target pH of 12.2 should be considered as a starting point for further tweaking, since it may elicit a different colour balance with various types of film.
One thing some people occasionally forget is to oxygenate the bleachfix. With small solutions this can be achieved by shaking the bottle vigorously until your arms fall off (or for 1 minute, whichever comes first). The resultant oxygen buildup activates the bleach. Failure to do so may result in colour casts in the shadow regions of your slides.
I keep the final rinse in three 1 litre bottles (for six 500ml rinse cycles) which are initially filled at roughly 40° before starting the process. There's no room for these in the CPE, so they can be kept wrapped in newspaper or towels during the process. By the time they're needed (ca. 30 minutes into the process) the rinse should still be within tolerance, since temperature is no longer critical at this stage.
For the sake of consistent results, I use distilled water for the critical solutions: first developer, first rinse, reversal, and colour developer. I also use it for the final bath to avoid water stains.
Once preparations are complete, you're off! I use the low speed setting (25 RPM) on the CPE2 for everything except rinsing. JOBO generally recommends the high speed setting (65 RPM, or 75 RPM on the newer CPE2+, which lacks the low speed), but I didn't notice any adverse effects from slower agitation, and theoretically it reduces oxidation and is easier on the motor. I do run the first 10-15 sec at high speed when pouring a solution though, in order to distribute it evenly over the film before slowing down. But as ever, your mileage may vary.
My version of the AP44 process is as follows:
- Temper loaded tank for ca. 25-30 minutes. This gets the film up to processing temperature.
- First developer (FD). Should be at ca. 40° to compensate heat loss during pouring. At this temp, I established a time of some 7-8 minutes for my setup.
- First rinse (4 x 250 ml @ 1 minute each). Prevents contamination of reversal bath.
- Reversal bath (RE) for 1 minute.
- Colour developer (CD) for 6 minutes. This solution is simply used to completion. Note that Tetenal's 3-bath process incorporates steps 4 and 5.
- Bleachfix (BX) for 8 minutes. This stuff is also used to completion.
- Final rinse (6 × 500 ml @ 1 minute each). I chuck in about half of each 1 litre bottle per cycle. No need to be exact here.
- Remove film from tank. Don't panic if it looks crappy. :^)
- Final bath or stabiliser (ST) for ca. 1 minute. This contains a wetting agent to prevent water stains plus formaldehyde to preserve the slides (don't breathe too hard). Note that this stuff can be reused, unlike the other solutions.
- Curse or rejoice, depending on the outcome... :^)
Note that the level of the tempering bath in the processor drops when bottles are removed for use during the process. I keep an empty bottle around to fill the gap left by the currently used solution to maintain a constant tempering bath level.
The figure below depicts the setup in the CPE2. I also summarised the procedure as a guide for myself and keep it on my lab wall for quick reference. Here's a printable version to decorate your lab...

Links
JOBO's E6 manual: A comprehensive guide to get you started and aid in troubleshooting.Back to photo stuff
 Back to GanjaTron's site